< Seam Portlet Bridge … | RichFaces Plugin Released >
One of the reasons why I’ve come to love Seam is that it really lives up to its appellation as a programming and integration model – because of its ability to let me use technologies which are complex in their own right without the need to learn the nitty gritty of them. One example is the use of facelets for email, something which if I had to do programmatically using the JavaMail API will be quite a hell. With Seam all I have to learn are new facelets tags related to email. I still have access to my Business Process, Application, Session,Conversation etc contexts and can use resources from these contexts just like a normal facelet which generates a web page. Another one is pdf rendering, and that is what we’ll be talking of today.
I’ll use the shopper application that I developed for my previous post on AJAX, DataTables and Seam. Before we go on though, let’s not forget to mention the need for the following jar files in your classpath as per Chapter 16 of the Seam reference manual.
-
itex.jar
-
jboss-seam-pdf.jar
Next add these declarations to your web.xml file
<servlet>
<servlet-name>Document Store Servlet</servlet-name>
<servlet-class>org.jboss.seam.pdf.DocumentStoreServlet</servlet-class>
</servlet>
<servlet-mapping>
<servlet-name>Document Store Servlet</servlet-name>
<url-pattern>*.pdf</url-pattern>
</servlet-mapping>
And these to your components.xml file, making sure the namespace is properly declared
<pdf:document-store use-extensions="true" />
Since we will be using charting from JFreeChart, we need to add these additional jars.
-
jcommon.jar
-
jfreechart.jar
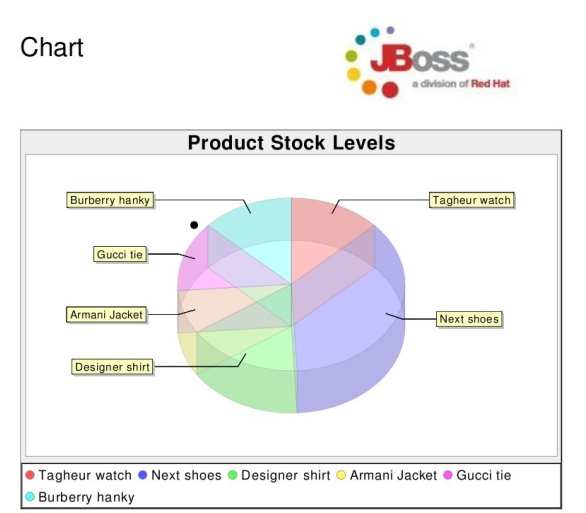
I’ve decided to add two links that render pdf documents. One provides a pie chart of the products held in my database and their stock levels. Very simple use case, since all I have to do is to select the products I’m interested in into an ArrayList and display them.
public List<Product> getProductView(){
return entityManager.createQuery("Select p from Product p").getResultList();
}
Here is the section of the facelet that displays the contents of the resulting ArrayList.
<p:image alignment="right" wrap="true" value="/jboss.jpg" />
<p:font id="test" size="24"><p:paragraph spacingAfter="50">Chart</p:paragraph></p:font>
<p:piechart title="Product Stock Levels" width="500" height="350" legend="true" is3D="true" plotForegroundAlpha=".25">
<ui:repeat value="#{shopList.productView}" var="item">
<p:data key="#{item.name}" value="#{item.stock}" />
</ui:repeat>
</p:piechart>
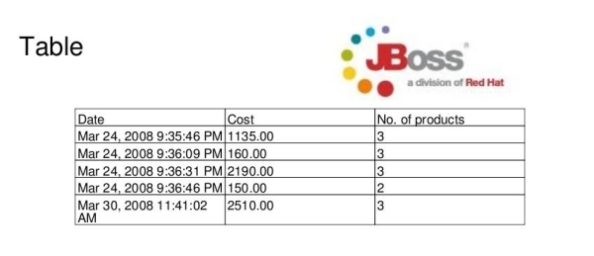
Now that the easy one is out of the way, lets look at the second link. This is to render a table telling us the date a cart was created, the total cost and the number of products in that cart. Well, date and cost fields are already declared on the Cart entity we created and we could do cart.getCartItems().size and get the number of products in each cart. But I decided to use a less talked about feature of JPA – native queries. Native queries enable us write SQL statements to retrieve records in our database that may not have been captured, modelled or contained in an existing entity. These allow us to write very complex queries and apply aggregation functions and so on on data.
We begin by first examining our query
select cart.date_created as date,cart.cost as cost, count(cart_item.product_id) as products from cart left join cart_item on cart_item.cart_id=cart.id group by date
Hmm. We have three aliases/fields being fetched from the database. JPA requires the declaration of an @SqlResultSetMapping which assigns a name to a native query and the fields that will be fetched from that native query. I decided to declare mine on the Cart entity, though I could have declared it on any entity.
@SqlResultSetMappings({
@SqlResultSetMapping(
name = "productStock",
columns = {
@ColumnResult(name = "date"),
@ColumnResult(name = "cost"),
@ColumnResult(name = "products")
})}
Having sorted out what I want to fetch and meeting JPA’s requirements on declaring a @SqlResultSetMapping, I now go on to fetch the data using the entityManager.
public List<Map> getCartView(){
List<Object[]> results = entityManager.createNativeQuery(
"select cart.date_created as date,cart.cost as cost, count(cart_item.product_id) as products from cart left join cart_item on cart_item.cart_id=cart.id group by date","productStock").getResultList();
List data = new ArrayList<HashMap>();
if (!results.isEmpty()) {
for (Object[] result : results) {
HashMap resultMap = new HashMap();
resultMap.put("date", (Date)result[0]);
resultMap.put("cost", result[1]);
resultMap.put("products", result[2]);
data.add(resultMap);
}
}
return data;
}
There are lot of things to note here.
-
We use entityManager.createNativeQuery(), not entityManager.createQuery().
-
After stating the query, you must also give the name of the named query which you defined in the SqlResutSetMapping. Ours is “productStock”.
-
Each row/record of data fetched from the database is assigned to an Object array. In this case “date” is in the 0th index, “cost” is in the 1st and so on. Since I’m fetching more than one, I use entityManager.getResultSet() and assign to a List.
Expression Language( EL) allows us to refer to data in a Map by its key, and that feels more natural to me on my facelet than referring to indexes of an array, so I rather iterate through my “results” List, creating a HashMap for each row/record from the database and using appropriate names to refer to the fetched data.
Now here’s the facelet that renders the table containing our records.
<p:image alignment="right" wrap="true" value="/jboss.jpg" />
<p:font id="test" size="24"><p:paragraph spacingAfter="50">Table</p:paragraph></p:font>
<p:table columns="3" headerRows="1">
<p:cell ><p:paragraph alignment="center">Date</p:paragraph></p:cell>
<p:cell><p:paragraph>Cost</p:paragraph></p:cell>
<p:cell><p:paragraph>No. of products</p:paragraph></p:cell>
<ui:repeat value="#{shopList.cartView}" var="data">
<p:cell><p:paragraph><p:text value="#{data.date}"><f:convertDateTime dateStyle="medium" type="both"/></p:text></p:paragraph></p:cell>
<p:cell><p:paragraph>#{data.cost}</p:paragraph></p:cell>
<p:cell><p:paragraph>#{data.products}</p:paragraph></p:cell>
</ui:repeat>
</p:table>
Explaining each of the individual tags on this facelet is out of the coverage area of this post and further details can be gleaned from the Seam Reference Manual. However using EL, I can just refer to the date field as #{data.date} and so on and we will all be none the wiser. Of particular interest is the use of the <p:text/> tag. It allows us to apply JSF formatting/conversion etc on data being rendered in a PDF, and here we needed to format the date using the f:convertDateTime. Another use of this is to determine if some data will be rendered using the standard “rendered” JSF component attribute.
The combination of bijection and contexts means that Seam can always find whatever I’m referencing in its appropriate context and display it for me, whether on a facelets web page, PDF, email or in an asynchronous process.
Added on 7th April 2008
Give the code a spin and see.

